
Here is a step by step tutorial about adding a sample BackgroundTask to your solution. The presented procedure is the same for: Windows Phone 8.1 Silverlight, Runtime and Windows Universal Apps. All the needed informaion you will also find at MSDN.
What is a BackgroundTask? In short – it’s a lightweight code that the OS run in the background. Its purpose can be various and it can nicely extend your App. In this example we would write an App for Windows Phone 8.1 Runtime (but as I’ve mentioned before the steps are the same for other platforms). We will write a BackgroundTask that will send a Toast message from background. Where to start?
1. Fisrt we have to add a new RuntimeComponent to our solution. To do this, right click on your solution in Solution explorer window in Visual Studio. Then click Add, New project… and choose Windows Runtime Component (Pic. 1) - depending on your purpose it can be portable or windows phone.
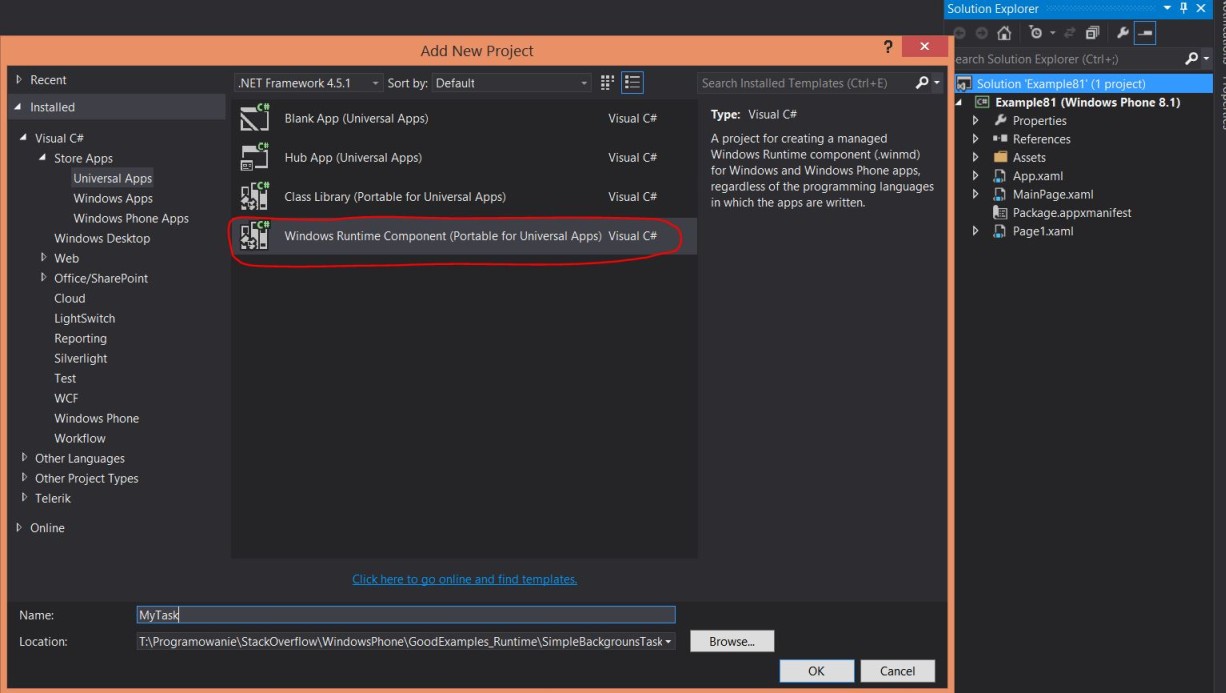
Pic. 1 Add WinRT Component
Pic. 2 Add reference
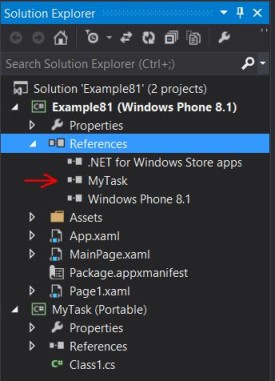
2. Once we have the new project added, we need to add a reference (Pic. 2) to it in our main project in which we will register our BackgroundTask – without this step, our App will crash once we try to run the background code.
3. Here comes the time to define our BackgroundTask. Of course the purpose of it depends on our needs. Let our task inform the User that it is running – for this we will implement a Toast message. We shall also remember that to make it work we need to set our App as Toast capable – open Package.appxmanifest file, chose Application tab, in section Notifications set App as toast capable. The simple code of our task can look like this:
|
1 2 3 4 5 6 7 8 9 10 11 12 13 14 15 16 17 18 |
namespace MyTask { public sealed class FirstTask : IBackgroundTask { public void Run(IBackgroundTaskInstance taskInstance) { // simple example with a Toast, to enable this go to manifest file // and mark App as TastCapable - it won't work without this // The Task will start but there will be no Toast. ToastTemplateType toastTemplate = ToastTemplateType.ToastText02; XmlDocument toastXml = ToastNotificationManager.GetTemplateContent(toastTemplate); XmlNodeList textElements = toastXml.GetElementsByTagName("text"); textElements[0].AppendChild(toastXml.CreateTextNode("My first Task - Yeah")); textElements[1].AppendChild(toastXml.CreateTextNode("I'm a message from your background task!")); ToastNotificationManager.CreateToastNotifier().Show(new ToastNotification(toastXml)); } } } |
What is imortant in the code above:
- we need to define a sealed class that will implement IBackgroundTask interface – which means that we will have to write a public void Run(IBackgroundTaskInstance taskInstance) method, that will perform our background work.
- the name of the class and the namespace are imortant as we will have to specify the entry point of our BackgroundTask (see next step)
- our Run method can be asynchronous, in this case we will have to obtain a BackgroundTaskDeferral by using a taskInstance.GetDeferral() method. This will inform the OS that our background task might continue to perform work after the Run method returns. We must only remember to call BackgroundTaskDeferral.Complete() once we finish our job.
4. Now is the time to declare the entry point of our background task. To do this we need to open Package.appxmanifest file, find Declarations tab, choose BackgroundTask in dropdown menu and click Add. We should see it defined in the list below. We must also decide the type of our BackgroundTask - if it will be invoked upon System event, Timer or other. For the purpose of this example we will use Timer type – our task will be fired upon TimeTrigger event. All this you can see in the picture 3.
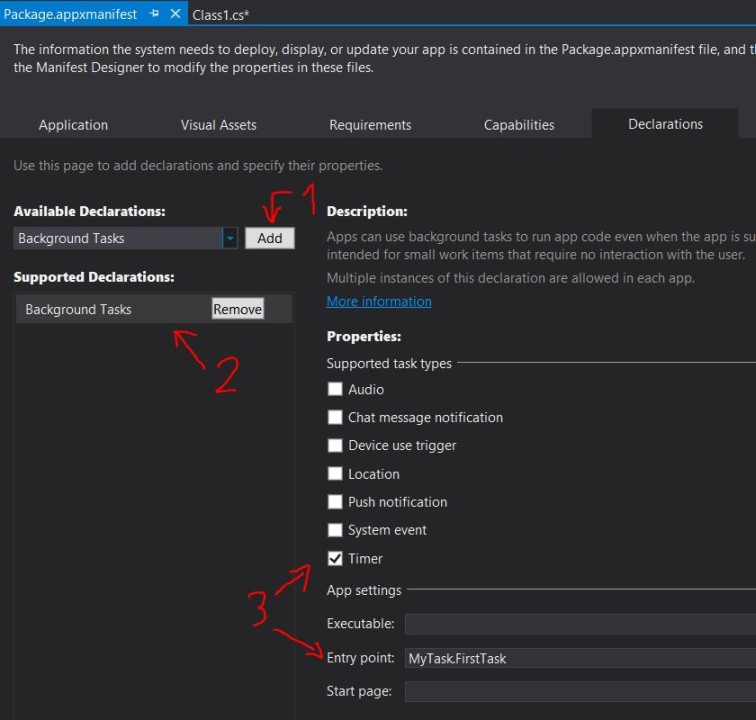
Pic. 3 Declarations
5. The time has come to register our BackgroundTask. First we shall check if the task is already registered, to do this we can enumerate BackgroundTaskRegistration.AllTasks , for the sake of simplicity, once we have found our task, we will just return from the method. To register the task we will use BackgroundTaskBuilder - we will need to specify its entry point (the same as we had set in Declarations), provide a name of the task, set the Trigger (that will fire our task) and optionally we can specify SystemCondition. The sample code can look like this:
|
1 2 3 4 5 6 7 8 9 10 11 12 13 14 15 16 17 18 19 20 21 22 |
private async void RegisterBtn_Click(object sender, RoutedEventArgs e) { string myTaskName = "FirstTask"; // check if task is already registered foreach (var cur in BackgroundTaskRegistration.AllTasks) if (cur.Value.Name == myTaskName) { await (new MessageDialog("Task already registered")).ShowAsync(); return; } // Windows Phone app must call this to use trigger types (see MSDN) await BackgroundExecutionManager.RequestAccessAsync(); // register a new task BackgroundTaskBuilder taskBuilder = new BackgroundTaskBuilder { Name = "First Task", TaskEntryPoint = "MyTask.FirstTask" }; taskBuilder.SetTrigger(new TimeTrigger(15, true)); BackgroundTaskRegistration myFirstTask = taskBuilder.Register(); await (new MessageDialog("Task registered")).ShowAsync(); } |
In the code above, we have registered a task that will be fired upon TimeTrigger event. Althought we have set its freshness time to 15 minutes, it doesn’t mean that it will be fired exacly after this time – OS has a build-in timer that runs background tasks in 30 minutes intervals on Windows Phone (15 minutes on Windows). We have also set the task as OneShot, which means that it will be fired once (not in 15-30 minute intervals).
Finally once we click the button (invoke the method), our BackgroundTask will be registered and it should be run after 15-30 minutes. But what to do to test it faster – do we, as developers, have to wait? No, there is quite an easy way to invoke the BackgroundTask earlier, upon demand. To do this we have to open the Debug location toolbar in Visual Studio, select our task from dropdown menu Lifecycle events (sometimes you may need to open the menu few times to refresh it) and once we click on the name it will be fired (Pic. 4).

Pic. 4 Test the Task
The complete working example you can download here – SimpleBackgrounsTask
Each post's copyright held by the original author. All rights reserved.
Thank you so much for a great article, it really helped me in developing my first Windows Phone 8.1 app.
It’s nice to know that someone has found it usefull. Thank you for the comment.